Electronic Tax Returns Filing System : Tanzania Revenue Authority
Name of the Organization : Tanzania Revenue Authority
Type of Facility : Electronic Tax Returns Filing System
Country : Tanzania
| Want to comment on this post? Go to bottom of this page. |
|---|
Official Website : https://www.tra.go.tz/
TRA Electronic Tax Returns Filing System
This system has been developed with the main objective being the easing of the tax returns submission process by taxpayers.
Related : Tanzania Revenue Authority Aruti Online Job Application : www.statusin.org/4796.html
The system was developed contains functionalities in order to facilitate the following :
** Taxpayer will be required to register into the system using their respective TIN, Email, and Address details.
** TRA will issue out an  Electronic Filing Identification Number automatically upon completion of registration process.
** The Taxpayer will then be receive his password by e-mail.
** The Taxpayer will then be able to log in and be able to make returns submissions.
** This manual explains the many ways in which to use the system.
Taxpayer Registration
** In order to file Tax Returns electronically to TRA the Taxpayer will be required to visit the TRA website at http://www.tra.go.tz and Click on the E-filing hyperlink. This will take the Taxpayer to the E-filing system web interface.
** The Taxpayer will have to register into the system on initial access, because only after registration will
** the Taxpayer be able to login and subsequently submit returns.
** To Register Click on the Register New User link
** The Taxpayer will then be taken to the Registration page
** The Taxpayer will then be required fill the “TIN” textbox with the respective Taxpayer’s TIN after which the system will check whether the Taxpayer has undergone Biometric Scanning and if successful the system will then query the TIN database for the Taxpayer’s General Information i.e. VRN, Taxpayer’s Name and Tax Office and display them in the appropriate fields.
** If the TIN belongs to a Company/Corporate Entity, the system will prompt for TIN for one Director and will hence check if Director has undergone Biometric Scanning before proceeding to retrieve Taxpayer’s General Information.
** The Taxpayer will be required to fill the TIN Registration Date for verification; if the wrong date is entered the Taxpayer will not be allowed to proceed with the registration process.
** Upon entry of the correct TIN Registration Date, the Taxpayer will then be allowed to proceed to fill in the fields that are not populated with information queried from the TIN database like the Declarant’s Names, Email, Security Question and Answer and Personality of the e-Filer.
** Once all the fields have been filled the Taxpayer can then click on the Create User button which take the Taxpayer to a screen which will display a preview of the Information entered.
** The Taxpayer will the press Create User button on confirmation of the accuracy of the Information provided.
** A User Created message will then appear on the screen that the Taxpayer’s Account has been created.
** On completion of the registration process an email will be sent to the e-Filer notifying him on the the success of his registration while also containing the e-Filing Identification Number (e-FIN) which the e-Filer will use as the Username to login to the system and a Password.
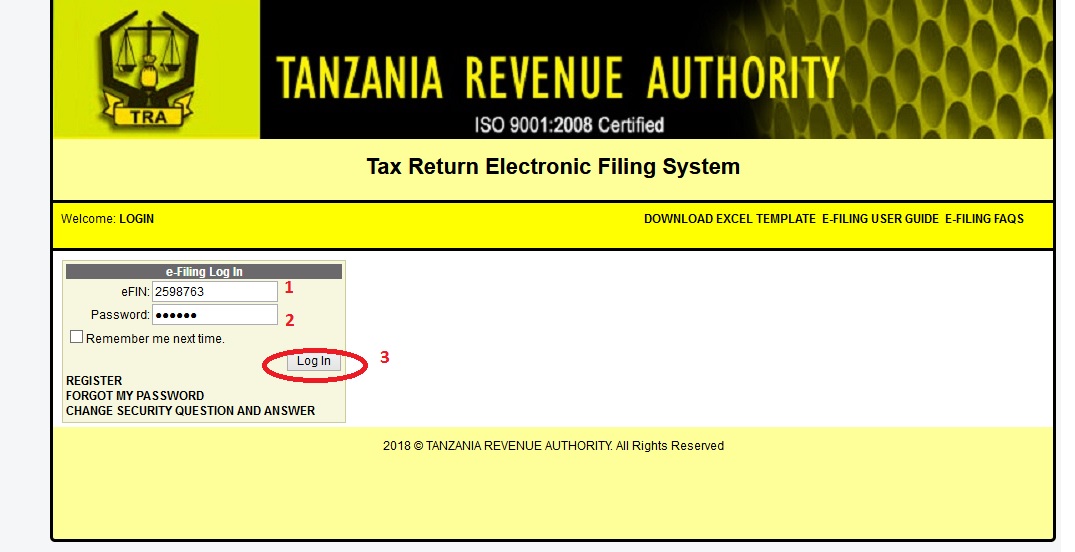
Logging into the System :
** Once the e-Filer has been able to obtain both the e-FIN and password, he may then be able to gain access into the system through the login page and be able to file his documents electronically.
** On successful login for the first time, the e-Filer will be taken to the Change Password Page where the e-Filer will be prompted to enter his existing password and his new password and then click on the Change Password button.
** Upon successfully changing the password a notification message will display and the confirmation message.
** Once the e-Filer clicks on the “Continue” button, the Report page will load where general information of the Taxpayer and the various documents available for submission will be seen.
** To Logout the e-Filer can click on the Log Out link at the top of the page.
Submitting a Tax Return
Currently, once logged in the e-Filer currently can be able to submit the VAT return :
a. Submitting a VA T Return To Submit a ITX240.01.B_VAT Return, the E-Filer should first login, then once successfully logged in, the E-Filer should click on the “Value Added Tax RETURN” link where a ITX240.01.B_VAT form will load.
** The e-Filer is required to fill the fields on the form appropriately, on completion the e-filer can then confirm by checking the “I have completed filling Part 1 of this return” checkbox.
** The e-Filer will then be required to click on the “Next Page” link which will load up the VAT Return Supplementary Page.
** Because of the information that needs to be included in the VAT Return Supplementary Page form, a provision has been made to allow the e-Filer to upload Return Information from a prepared Excel / XML file or fill in the field provided on the form.
** In order to upload information from an excel /xml file the following steps should be followed.
For the High Value Tax Invoices for Purchase fields, the Excel file should contain seven columns, namely :
** SUPPLIER_NAME
** SUPPLIER_VRN
** TAX_INVOICE_NUMBER
** DATE_OF_INVOICE
** GOODS_DESC
** AMOUNT_VAT_EXCL
** VAT_AMT
If the Returns details are prepared in XML then the aforementioned columns above will be designated as sub-child nodes in the XML file. As shown below.
<? xml version=”1.0″ encoding=”utf-8″?>
<vat_supplement>
<return>
<SUPPLIER_NAME>BIASHARA</SUPPLIER_NAME>
<SUPPLIER_VRN>10007025B</SUPPLIER_VRN>
<TAX_INVOICE_NUMBER>3242</TAX_INVOICE_NUMBER>
<DATE_OF_INVOICE>11/5/2010</DATE_OF_INVOICE>
<GOODS_DESC>Lotion</GOODS_DESC>
<AMOUNT_VAT_EXCL>20000000</AMOUNT_VAT_EXCL>
<VAT_AMT>50000</VAT_AMT>
</return>
</vat_supplement>
Once data is filled within the corresponding columns on the excel file, the e-Filer will be required to change the name of the worksheet to “ITX241.01.B_VAT” and then save the file as an .xls file (Excel 97 – 2003 Workbook).
The e-filer can save the excel file with any filename.
The following should be observed while preparing the excel/xml file :
** The file should not have any formatting ie borders, coloring, underline etc
** VRN numbers should not contain hyphens
** The last letter in the VRN should be capital
** Dates of Tax Invoices should be in the (dd/mm/yyyy) format
** Amounts should not contain comma separators and can be upto 2 decimal places
** Once the E-Filer has completed preparing the Excel/XML file taking into consideration the provisions above, the E-Filer may proceed with uploading the file.
** The e-Filer will then click on the Upload button on the form, select the excel file from its saved location and then click on the “Open” button.
** The e-Filer will now be required to click the “View” button, in order to view the data he had prepared on the excel file from the system.
** Once the “Show” button is clicked, the system will start validating the VRNs in the SUPPLIER_VRN column; if the VRN does not exist the system will display an error message indicating the invalid VRN.
** The e-Filer will then be required to review his excel file and make sure the VRNs on the excel file are correct and the re-upload the file then view it. If all the VRNs pass the validation the e-Filer will then click on the Import button.
** If the e-Filer prefers to manually enter the information on record at a time, relevant fields have been provided to cater for the functionality.
** In this method there is also a VRN validation test in place whereby if the VRN supplied fails the test the e-Filer will not be able to continue inserting his information to the return.
** After inserting the information the e-filer is still provided with the ability to alter or delete the information he has entered onto the form before submission.
** Once the e-Filer is convinced on his successful completion of the complete VAT return, he may go back to the first page and tick the “I have successfully completed filing Part 1 of this return” checkbox and go to the second page and click the “Submit” button.
** If he has not completed filing the return but wishes to complete filing at another time, the e-Filer may leave the “I have successfully completed filing this return” checkbox unchecked and click the submit button.
** The e-Filer may then access the return at a later time by clicking on the “Saved Return” link from the Report page.
** On submission of the return to TRA an email will sent to TRA as acknowledgement of receipt for the return.